With Christmas on the horizon I’m starting to feel I ought to get organised, plan menus, shop for gifts – do all the things that I do every year to ensure my family has a good time over the festive period.

We’ll start the season with a trip to Mandurah to admire the Xmas lights in early December and follow that up with our (now) traditional eggnog night a week or so later. Some of us will make gifts to share, we’ll shop for get our Secret Santa gifts and – with luck – move smoothly through the rest of the Xmas festivities. It’s a happy, sociable time for all of us.

Sadly, Christmas isn’t a happy time for everyone. For many it’s stressful, bringing feelings of desperation and sadness rather than joy as people struggle to provide for their families over the holiday season.

According to the 2017 Foodbank Hunger Report, more and more Australians have to choose between feeding their families and paying their bills – and this is never more apparent than over the Christmas period.

So what can we do? We help – in any way we can.

In December 2015 Daughter Dearest and I took part in a reverse advent activity, collecting food items over several weeks and then delivering the hampers to Foodbank just before Xmas that year. Shopping for other people, thinking about what they might need or want was a real feel-good experience and we wanted to do it more regularly.

So, in 2016 we launched a quarterly food drive. We set up a Facebook group, called it Food Fight and invited a few people to join in. It started out small, with just a few of us contributing whatever non-perishables we could every three months.

In 2016 we collected and delivered over 200kg of food to Foodbank for them to distribute to those in need. This year we overtook that target in September, when we reached the 236kg mark. A great result.

The challenge is to see if we can crack 300kg by mid-December 2017. Can we do it? Can we, between us, contribute at least 70kg of food within the next month?

I believe so – and hope you do too. If we work together we can and will make a difference to some of Perth’s least advantaged people this Christmas.

How?

  • Get a box
  • Add a couple of extra items to your shopping trolley each time you shop over the next few weeks.
  • Choose some of items suggested by Foodbank (below) – but please remember, NO GLASS
  • Deliver your box of goodies to Menagerie10 (our place) by Thursday 14 December or contact Nik to arrange for a pick up run on Sunday 10 December.

Let’s work together to make Christmas a little brighter for some Perth families this year.

Life got busy over the past few months. Really silly, mind-numbingly busy. It crept up, tasks and commitments snowballing over us and gathering us up in their wake. It’s the kind of crazy downhill slalom that I find tends not provide much in the line of personal satisfaction, even if I know that the end result will be worth it.

Then, this evening, two things happened: I noticed we still had a giant pumpkin in the fridge – and a friend sent me a link to this video.

Ignoring the pumpkin, I sat down to watch the video. The take-home message for me was that being super busy can end up being isolating.

But we all need to eat – and eating together is more fun. And I have a giant pumpkin…

So, busy or not, the giant pumpkin’s been cut up and vat of soup is underway. Sourdough bread mix goes on next – and will be baked tomorrow when we randomly open our very sandy, discombobulated home to whoever feels like sharing a spontaneous pot luck meal.

Hope you can make it 🙂

With Himself off in foreign climes for the past few weeks, life has been interesting in a number of ways. It’s also been random and chaotic, so cooking just for myself has seemed like an unnecessary add-on to already overly busy days. To ensure I do actually eat, I came up with a cunning plan: pressure cooker soup. Each weekend I’ve cobbled together some or other variety of soupy-goodness, popped it in the fridge and then consumed it over the following week. I’ve had chicken and barley, mixed vegetable and, last week, pumpkin. All quick, easy, nutritious and very satisfying to come home to. Win all round.

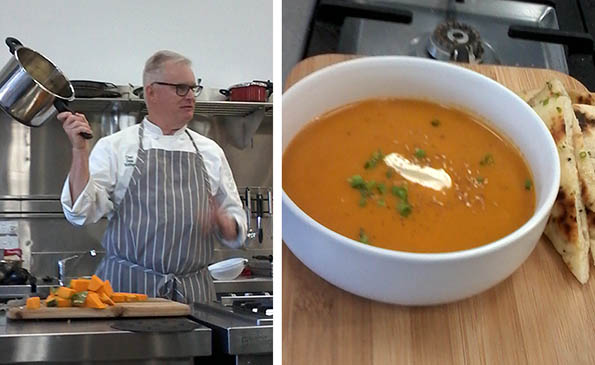
So when I saw that Chef Dale Sniffen was running a pressure cooker workshop last week, I immediately signed up in the hopes of some inspiration for other quick and easy options. As it turned out, the vehicle he chose to showcase pressure cookers was… pumpkin soup, which was quite amusing.

Admittedly there’s not a whole lot of technique to pumpkin soup. It’s one of those things that pretty much anyone can make. But we were treated to an entertaining couple of hours of his company and a wealth of cooking tips while Dale first made pure bone chicken stock, then used that to make his soup. Although the soup itself only took six minutes in the pressure cooker, the process of getting it to that point was all high theatre.

First came the caramelizing of the onions, with appropriate audience appreciation of colour and aroma. Then the adding of tomato paste and the slow simmer to bring out the intense tomato flavour in that before adding the ginger, nutmeg and bay leaf. More audience participation. Dale then deglazed the pan with the ‘richly aromatic and flavourful’ pure bone chicken stock. This achieved it was – finally – time to add the coarsely chopped pumpkin and potato, bring it all to the boil, attach the lid and wait for it to get up to pressure.

Six minutes later Dale ran cold water over the pressure cooker to achieve a fast pressure release, blitzed contents with a stick blender, stirred in some chopped butter, salt and (white) pepper – and we finally got to taste the result. He plated up his creation, garnished it with sour cream and sesame seeds, then served it with pieces freshly made flat bread – which was exceptionally good: soft yet crunchy, slightly salty and a perfect accompaniment to the soup.

I’ll definitely make the flat bread next time I make pumpkin soup, but I think I’ll stick to my tried-and-tested version, adapted from a recipe I found in 2008 (according to the notes I’ve scribbbled on it). Like Dale’s it can be made in a pressure cooker or in a conventional saucepan (which just takes longer). But it’s significantly simpler – which works for me. Let me know if you try either/both of the recipes – I’d be interested in some feedback.

Nik’s Thai Style Pumpkin Soup

What you need: 1 tablespoon extra virgin olive oil
, 2 medium brown onions (peeled and coarsely chopped
), 2 cloves of garlic (diced), 
2cm fresh ginger (peeled and sliced), 2 tablespoons red Thai curry paste (I’ve used green, but prefer the red)
, 1 large butternut pumpkin (washed, de-seeded and roughly chopped – don’t bother to peel it), 2 litres of chicken or vegetable stock (pure bone stock probably is best, but a couple of stock cubes and some water works fine), 1 packet dried coconut milk, reconstituted with water (or a 400ml can, if you prefer – but the dried stuff is a terrific pantry standby), juice of 1 lime (use lemon if you don’t have a lime to hand).

To make the soup: Heat a tablespoon of oil in your pressure cooker, then add the onions, garlic, ginger and curry paste. Cook, stirring gently over a low heat for about five minutes to release the flavours. 
Add the pumpkin chunks. Stir well, then add up to 2 litres of the stock – depending on pumpkin size (You want your pressure cooker at least 1/3 full and no more than 2/3 full). 
Stir well and bring the mix to the boil, then put the lid on the pressure cooker and let it come up to full pressure. At this point it’s important to reduce the temperature to low, then leave the pot at pressure for about six minutes.
 I usually just turn the heat off after this and leave the pressure to come down all by itself, but you can release the pressure more rapidly if you’re in a hurry by placing the pressure cooker in the kitchen sink and running cold water over the top of it. Once the lid’s off, blitz the soup to smooth paste, then return pot to the stove (no lid) and add the coconut milk and lime juice.
 Garnish with chopped fresh coriander when you serve it, along with a dollop of plain yoghurt, but as often as not I don’t actually bother. The soup is tasty as is.

Dale’s (delicious) Plain Flour Flatbreads

What you need: 500g (strong) plain flour (i.e. high in protein), 310ml water (weird amount, I know, but there you go), 7g active dry yeast, 2 teaspoons sugar, 1 teaspoon salt, 4 tablespoons olive oil, black peppercorns & some fresh rosemary leaves.

To make the bread: Place everything except the spices in the bowl of your electric mixer and, using the dough hook on low speed, mix for about 30 minutes. The dough should be soft but not too sticky. Cover and leave to rise overnight then turn the dough out, add the spices and knead until smooth. Divide into 6 equal portions and roll these each of these out into a (more or less) 15cm square shape, then pull and turn each one with your – shaping each one into something that resembles a (small) pizza base, less than 1cm thick. Melt about 100g of chopped butter and set this aside. Pop your frying pan on the stove and heat enough olive oil to just coast the bottom, then add your first flat bread. Cook for about 1- 2 minutes, until it starts to bubble up, then flip over to cook the other side – this doesn’t take very long. While side two is cooking, brush melted butter on side one (the cooked side) and sprinkle that liberally with freshly ground sea salt. Stack the cooked flatbreads until they’re all done, then slice into triangles and serve with your hot pumpkin soup.

NOTE 1: If you’re cooking for one, just cook one of the flatbreads and pop the other five rounds in the fridge or freezer for another day. Or cook them all, eat as many as make you happy and save the rest for the next time 🙂

NOTE 2: You can actually use any (unpeeled) pumpkin you like – butternut happens to be my preference.

NOTE 2: To make Naan, simply replace the water in the bread recipe with plain yoghurt.

My sister’s a great fan of all things quince. The first time she tasted it was when she was living in Angola many years ago. She was out shopping and bought a tin of what she thought was marmalade. The tin was labelled in Portuguese and, as she was still learning the language, she understandably thought that marmelo meant marmalade. As it turned out, it meant quince paste – also known as quince cheese.

She was an instant convert and went on to track down the raw fruit, finding the flavour astringent, rather tart and very much to her taste. I, however, had only ever tasted quince jelly (jam) until fairly recently and wasn’t overly impressed with it. But that was before I tried my hand at all things quince…

It all came about because friends of ours (Don and Ann) have nine mature quince trees on their property down in Collie, about 200km south east of Perth. A few weeks ago, when the bulk of their fruit was ripe, they decided to put a halt to trail of destruction that the local bird life was inflicting on the crop. To this end, they spent a couple of weekends stripping the fruit off all nine trees – and ended up with a LOT of surplus-to-requirement fruit.

So, one Sunday evening, the phone rang. It was Don, and the conversation went something like this: ‘Hello? Nik? Are you guys interested in some quinces? I have a few in my car and I’m half way back to Perth…’ ‘Sure, why not?’, said I, somewhat naively. ‘I’m sure I can do something with them…’

Don and his fruit-mobile arrived a couple of hours later. When I exclaimed at the quantity of fruit he presented us with, he just laughed – then told me I should see what was still in his car! Our share was four large carry bags of fruit, each bag containing about 45 quinces. This equated to approximately 9kg per bag (we weighed them!), which means we had in the region of 36kg of quinces in our fridge… and no idea what to do with them.

The fridge smelled terrific but I found that I don’t enjoy the fruit raw. Since I can’t bear to waste food, it became my mission to find out how to prepare it. I started by researching quinces and quince trees in general. I discovered that they’re related to roses, apples, pears, almonds, plums and apricots – that was a surprise. The trees are deciduous, hardy and drought-tolerant. They don’t require much maintenance (such as pruning, spraying, etc.), are self-pollinating and thrive in wide variety of climates – from temperate regions all the way through to the sub-tropics.

Quinces can be stored for up to three months in the fridge. They’re strange-looking fruit – a little like a cross between an apple and a pear in shape. But they’re slightly knobbly and their skin is both waxy and slightly furry to the touch. As the fruit ripens it goes from a light green to a lovely golden yellow and becomes surprisingly strongly and sweetly perfumed. It’s a very solid/dense fruit, but I’ve found that it bruises surprisingly easily – so some care is required when handling and preparing it.

I managed to offload about dozen or so fruit to DaughterDearest and saved a few for my sister, but have managed to process almost all the rest (we have about ten left). I discovered that the flesh, which starts off butter-coloured, turns pink and then a deep red when cooked – that was a surprise. My first adventure was quince paste – this was an epic endeavour that took thirteen hours all up. The slicing, dicing, cooking, stirring, pureeing and reducing took about seven hours. After this the mixture it went into a low oven for a further six hours to finish setting. Wow. The upside is that quince paste makes a great addition to cheese platters and keeps really well – which is lucky, since we now have a freezer full of it!

Next I tried two varieties of fruit leather – one spiced with cardamom, cinnamon and so forth, and the other with honey and lemon. Both turned out really well and we have a whole heap of that in the fridge.

We’ve also been eating slow-poached spiced quince on our muesli & yoghurt every morning for the past couple of weeks and I even made a quince (and almond) cake at the weekend. That was super-tasty too and well worth repeating. A big stride forward was to find that the fruit can be pressure cooked to save time, although I only found that out towards the end of the production line. I’ll know better next time.

All in all, I feel I’ve conquered quinces and done justice to Don and Ann’s gift of (36kg!) of quinces – but it’s definitely time to move on to other culinary adventures 🙂

I’d never heard Napoleon Cake until Ma-in-law put in a request for one for her 80th birthday. I can see why her mum only used to make it on rare (and very special) occasions, despite it being a much-loved treat. Whilst the cake part is simple enough (it’s just a sponge), the surrounding layers are what make it a bit of a challenge – the first time around anyway.

It starts with a layer of baked puff pastry, topped with a generous layer of butter cream (aka ‘mock cream’). Next comes a layer of raspberry jam, the sponge cake, more jam, more ‘cream’ and then a second layer of baked pastry. On top of this little lot goes a layer of sticky super-sweet pink icing to finish it off.

Protip #1: Back in the day, Ma-in-law’s mum used to actually make the pastry by hand, as it was well before the days of the frozen store-bought variety. Seriously, just use the frozen variety! It cuts down the construction time and simplifies things a whole bunch. Besides which, when she tasted the test-run, Ma said it was much nicer and lighter than the pastry her mum used to make 🙂

The cake took a whole afternoon to prepare and construct, but looked amazing in the end. The tricky parts were the butter cream, the bake-time for the pastry, the sheer stickyness of it all – and bringing it all together.

Protip #2: An extra pair of hands is essential at the end point. Himself was calm throughout my sticky dramatics and his help really was invaluable for the final assembly stage.

The response from visitors here for the afternoon ranged from Delicious! More? (Suz) to OMG! Instant diabetes… but sooo good! (K) 🙂

Daughter Dearest suggested we try a cream cheese icing in place of the butter cream to cut down on the sweetness factor, which might be worth a try at some point.

But not for Ma-in-law’s birthday party. What we made was exactly what she wanted, sweetness overload and all. It was 100% worth it when we took some of the finished product round to the Parents’ place that evening. Ma opened the front door and her whole face lit up.

Oh!, she said. Napoleon Cake! How Wonderful!

She enjoyed every delicious morsel – and has put in a firm request for a super-sized version for her birthday. So we’ll be having a Napoleon Bake-a-thon here in late February to construct the one cake to rule them all. If anyone wants to give a hand, let me know. 🙂

Here’s the recipe in case you’re interested in giving it a try at home. It’s based it on one provided by Sharen from Bundaberg, Queensland.  Her recipes range from pure indulgence to plain comfort food. They’re all traditional family favourites and she’s well and truly tested them all. I’m going to give her breakfast bake a try next.

For your Napoleon Cake you’ll need:
2 sheets of frozen puff pastry
½ cup raspberry jam – and everything listed below for the other layers.

For the Sponge Cake
2 large eggs
1 tsp vanilla bean paste
⅓ cup caster sugar
⅓ cup self raising flour
2 Tblsp cornflour

For the Butter Cream:
125g unsalted softened butter (½ cup)
2 cups icing sugar, sifted
2 Tblsp milk
¼ – ½ tsp vanilla bean paste / vanilla essence

For the pink icing
1 cup icing sugar
1 tsp soft butter
A dash of red food colouring
2 tsp milk (approx)

Protip #3: Start by making the sponge cake layer; it’s the easiest bit!

The Cake Layer
•    Preheat oven to 180C
•    Line a square cake pan with baking paper – mine is about 20cm and it worked well
•    Beat eggs and vanilla (use an electric mixer!) while you gradually add the sugar. Continue beating until the sugar is all dissolved and the mix light and fluffy
•    Sieve the flour & cornflour, then gently fold it into the mixture
•    Pour the mix into your prepared cake pan and bake for approx 15 minutes. The cake should be golden and springy to the touch when you take it out
•    Remove the cake from the tin and place on cake rack to cool completely **

The Pastry Layers
•    Increase your oven temperature to 210C
•    Line 2 baking trays with baking paper and place one puff pasty sheet on each
•    Bake for about 10 minutes, until the pastry is well risen, golden and crispy looking
•    Leaving the hot pastry on the trays, gently flatten each sheet with the bottom of the (now empty) cake tin**
•    Using the cake tin as a template, trim the pastry sheets to the same size as the cake
•    Now leave the pastry on the baking trays to cool
Protip #4: Don’t take the pastry out too soon or you’ll need to redo this step. #life lesson!

The Butter Cream Layer
•    Beat the softened butter until smooth; use the paddle attachment of your electric mixer
•    Gradually beat in the icing sugar until well mixed & fluffy
•    Add vanilla to taste
•    Add the milk and beat again until a smooth consistency and texture is achieved
Protip #5: My first attempt at this was an epic (!) fail. Be patient. Taste as you go and make sure the end result really is smooth.

Preparing the Pink Icing
•    Sieve the icing sugar into a microwave safe bowl
•    Mix in the butter and enough milk to form a stiff paste
•    Add food colouring until you have a nice shade of pink 🙂
•    Microwave the icing 10 seconds, then stir well
•    Repeat this step until the icing mix is runny

Assembling the Cake
•    Place one baked puff pastry sheet on a serving plate & spread it with half the butter cream
•    Now spread half the jam on top of the cake and invert the cake onto the butter cream layer
•    Carefully spread the rest of the jam on top of the cake layer
•    Next spread the remaining butter cream on one side of the remaining sheet of baked puff pastry, then invert and position the pastry sheet on top of the other layers.
•   Pour the icing onto the top of the cake (slowly and carefully) and smooth with a knife / spatula
•    Pop the cake in the fridge to let the icing and mock cream firm up a bit

To Serve
•    Cut the cake into rectangles to serve
•    Use a serrated knife to do this. ‘Saw’ through the pastry gently so that you don’t squish the filling
Protip #6: This cake is SUPER sweet, so don’t make the slices huge!

Another version of this can be found in the NZ Women’s Weekly